How to Automatically Forward Emails to Multiple Recipients in Gmail
On average, email users globally have 1.75 email addresses, according to Convince&Convert. Many working adults end up having a “spam email” for various subscriptions, an “important” email address for sensitive financial transactions, and a corporate inbox on top of that.
With all the exponential growth of email accounts in one’s life comes the responsibility of control not to miss important correspondence. This makes a user look for the answers to a highly technical question: How do you forward emails in Gmail to multiple recipients?
This is your step-by-step guide to all things Gmail forwarding functionality.
Why Forward Emails to Multiple Recipients?
OK, let’s get things straight: you cannot add multiple forwarding addresses and be done with it, as Gmail has a technical limitation. This cloud email service can allow you to forward only to a single user.
However, there is a workaround. Users can still forward Gmail to multiple addresses by making an extra step—creating a specific filter for all extra addresses.
On the other hand, this is also an opportunity to use that filter to its full potential: to forward only specific messages if so needed, reducing the amount of memory usage across your accounts.
Why would you need forwarding to start with?
- You only choose to have one mail account on your phone, but you need to check messages from all your accounts. On your vacation, for example.
- Going offline for a vacation is another example of why people enable their email forwarding feature, as business needs to keep going even though one team member is enjoying the rest. This is when the auto-forward Gmail to multiple addresses feature comes in handy, as a few colleagues can keep an eye on the clients of their team members, depending on their shifts. The corporate environment is where users need to do a lot of email forwarding for many reasons.
- In private life, you may want to forward specific emails, like some financial notifications for a house you all live in with your family.
- Also, you may want to share some of the discounts or local news that come to your loyalty account, so if your family would like to use it, they can use your loyalty account card to take advantage of savings.
- Or, you just want to have a single email mission control room—so that you can get new correspondence info in one inbox—without having to check a few email addresses all the time.
Whatever your reason for forwarding the email to multiple addresses, this is how you do it in Gmail and Workspace.
How to Set Up Automatic Email Forwarding to Multiple Recipients
This is a 2-step process, as you will need to enable forwarding to one account and then create filters to enable Gmail to forward to multiple emails.
Forwarding the Emails in Gmail (single recipient only)
You can only perform this on the desktop version of Gmail. To enable email forwarding, go to your Gmail account on your computer.
- Open Settings in your Gmail account.
- Click See all settings in the right sidebar.
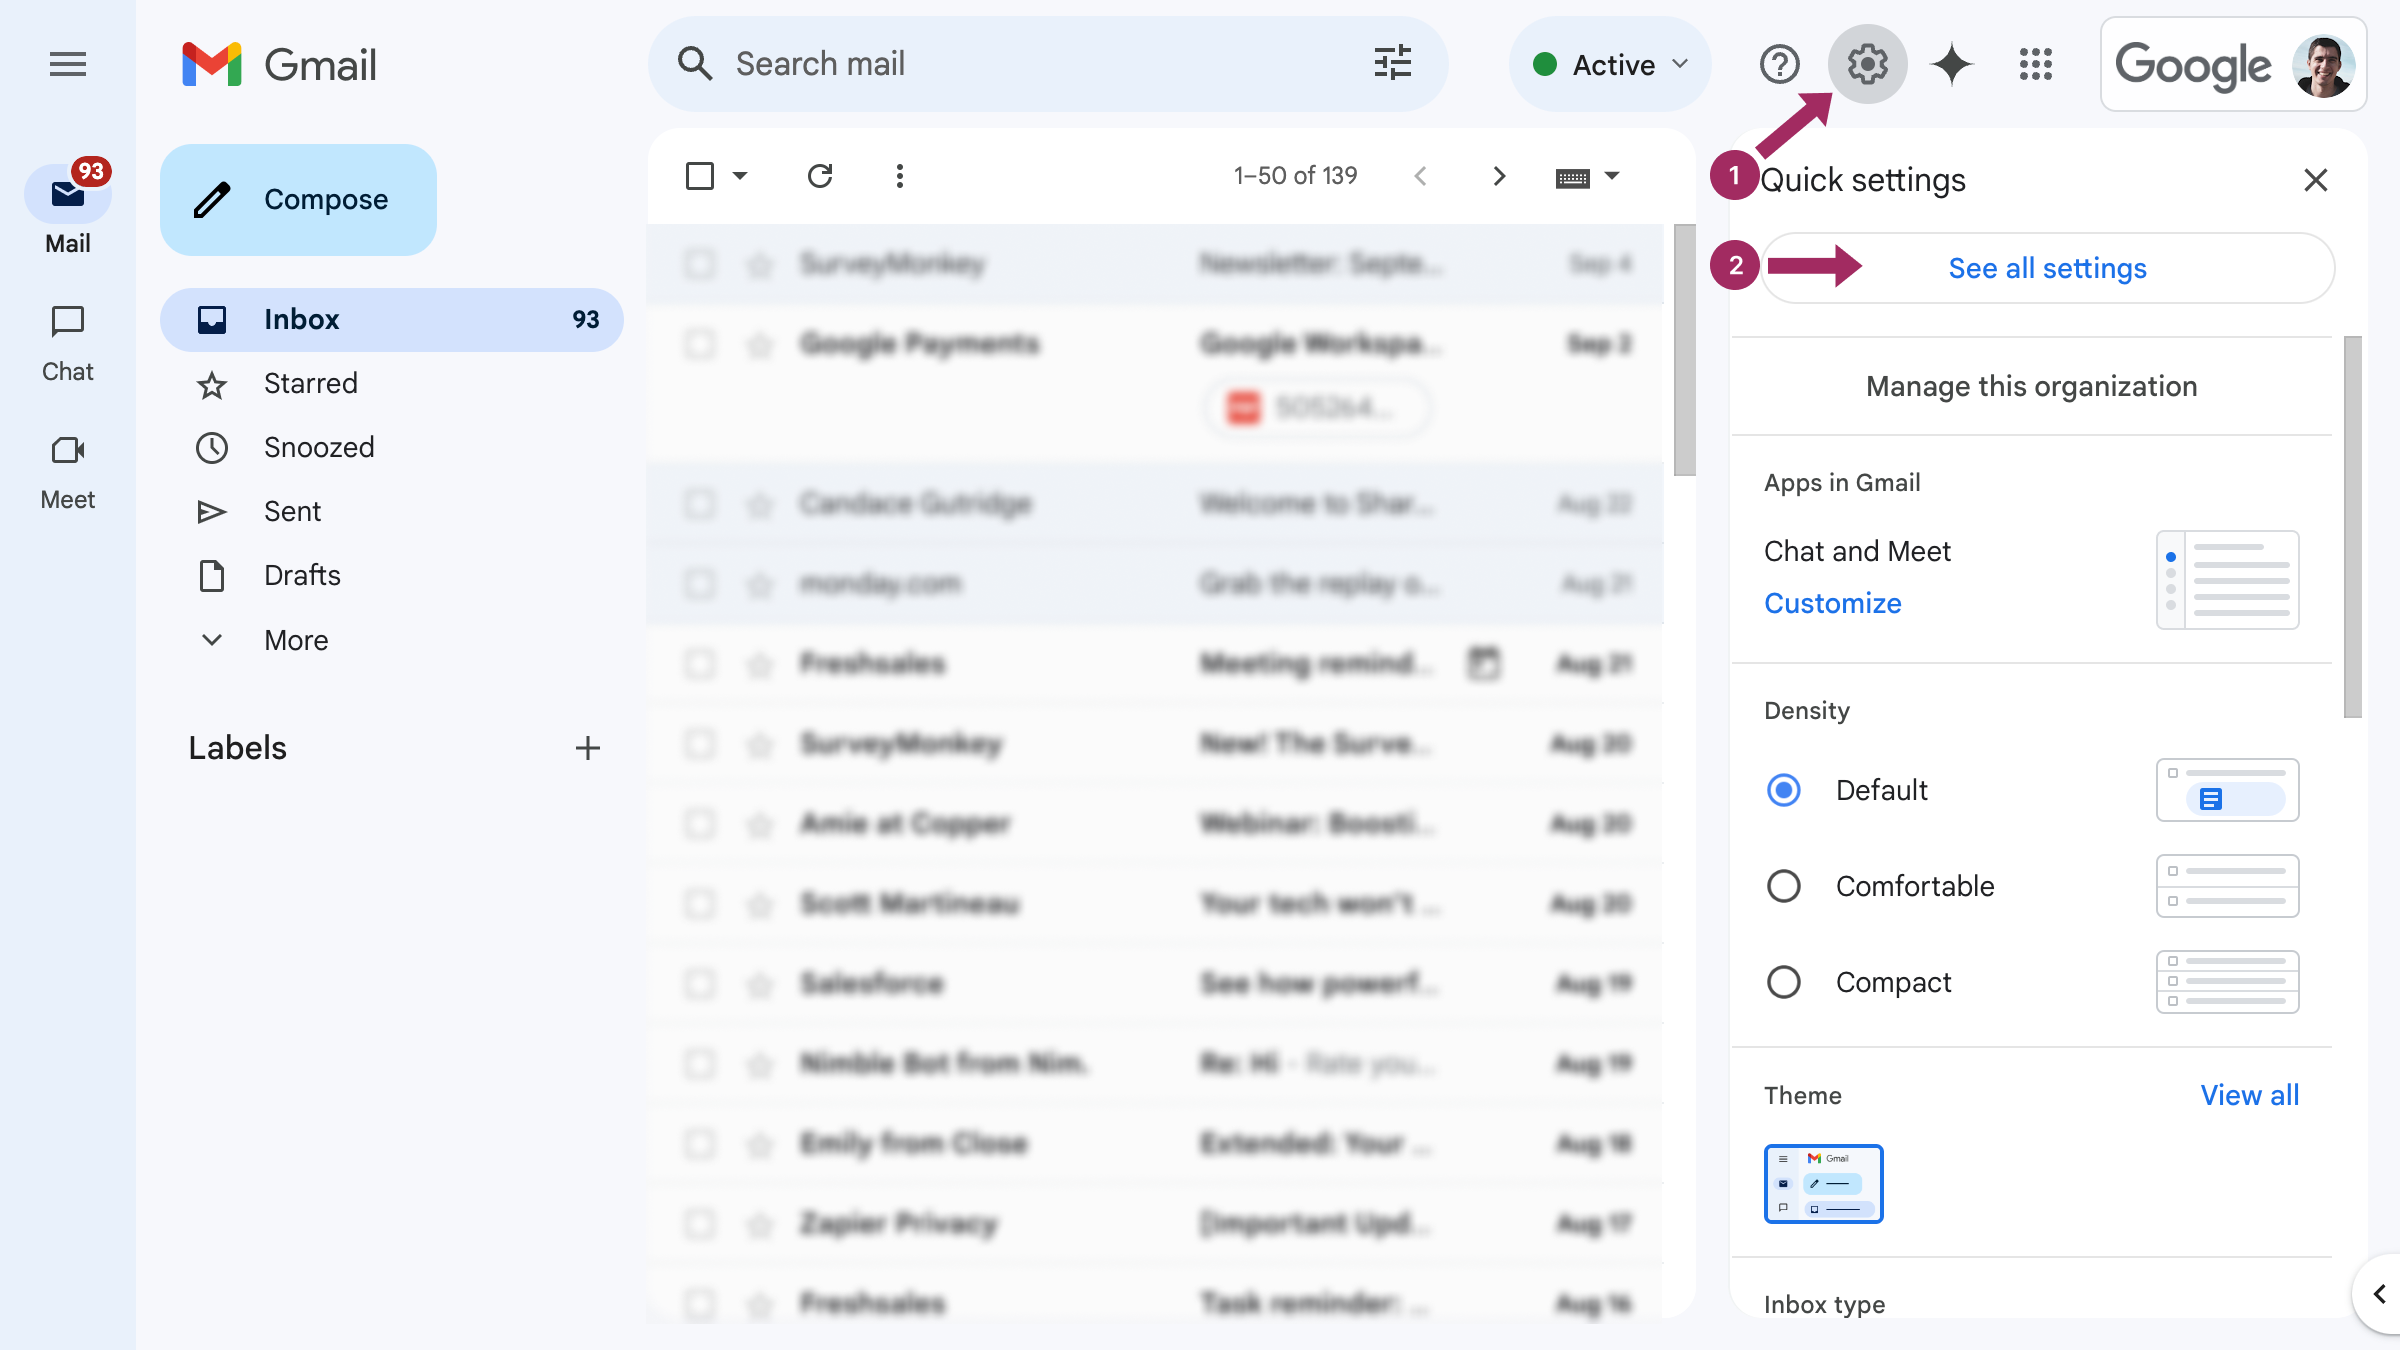
- Select the tab Forwarding and POP/IMAP and click Add a forwarding address.
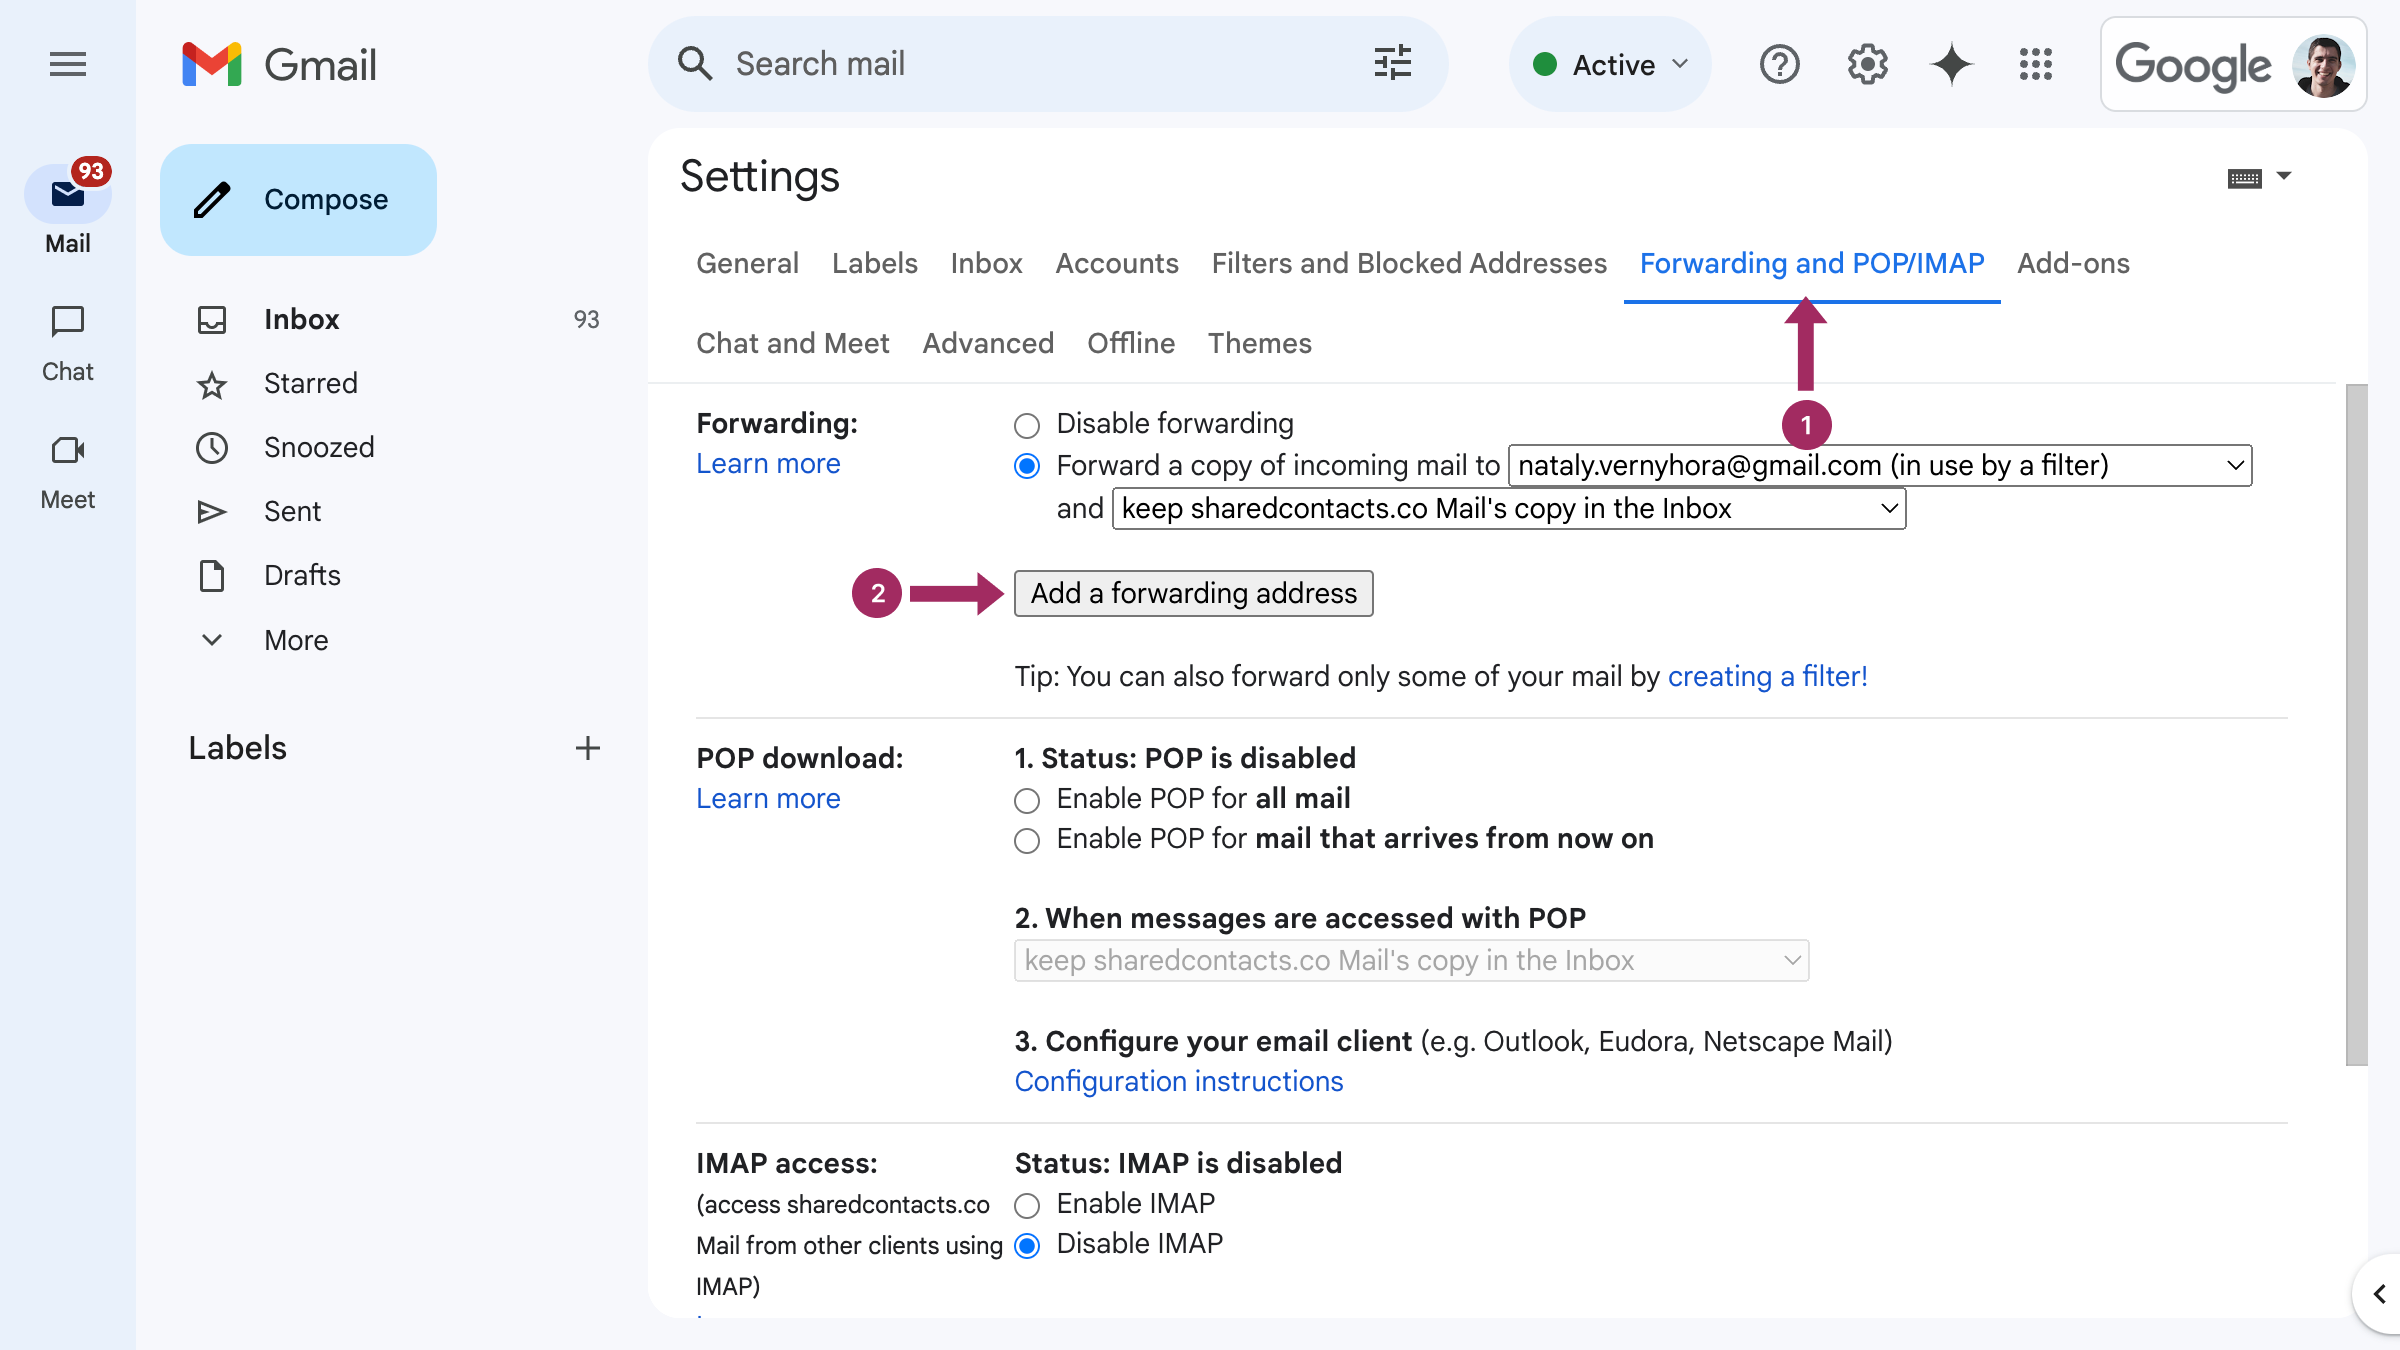
- Type in the email address you need to forward your email correspondence.
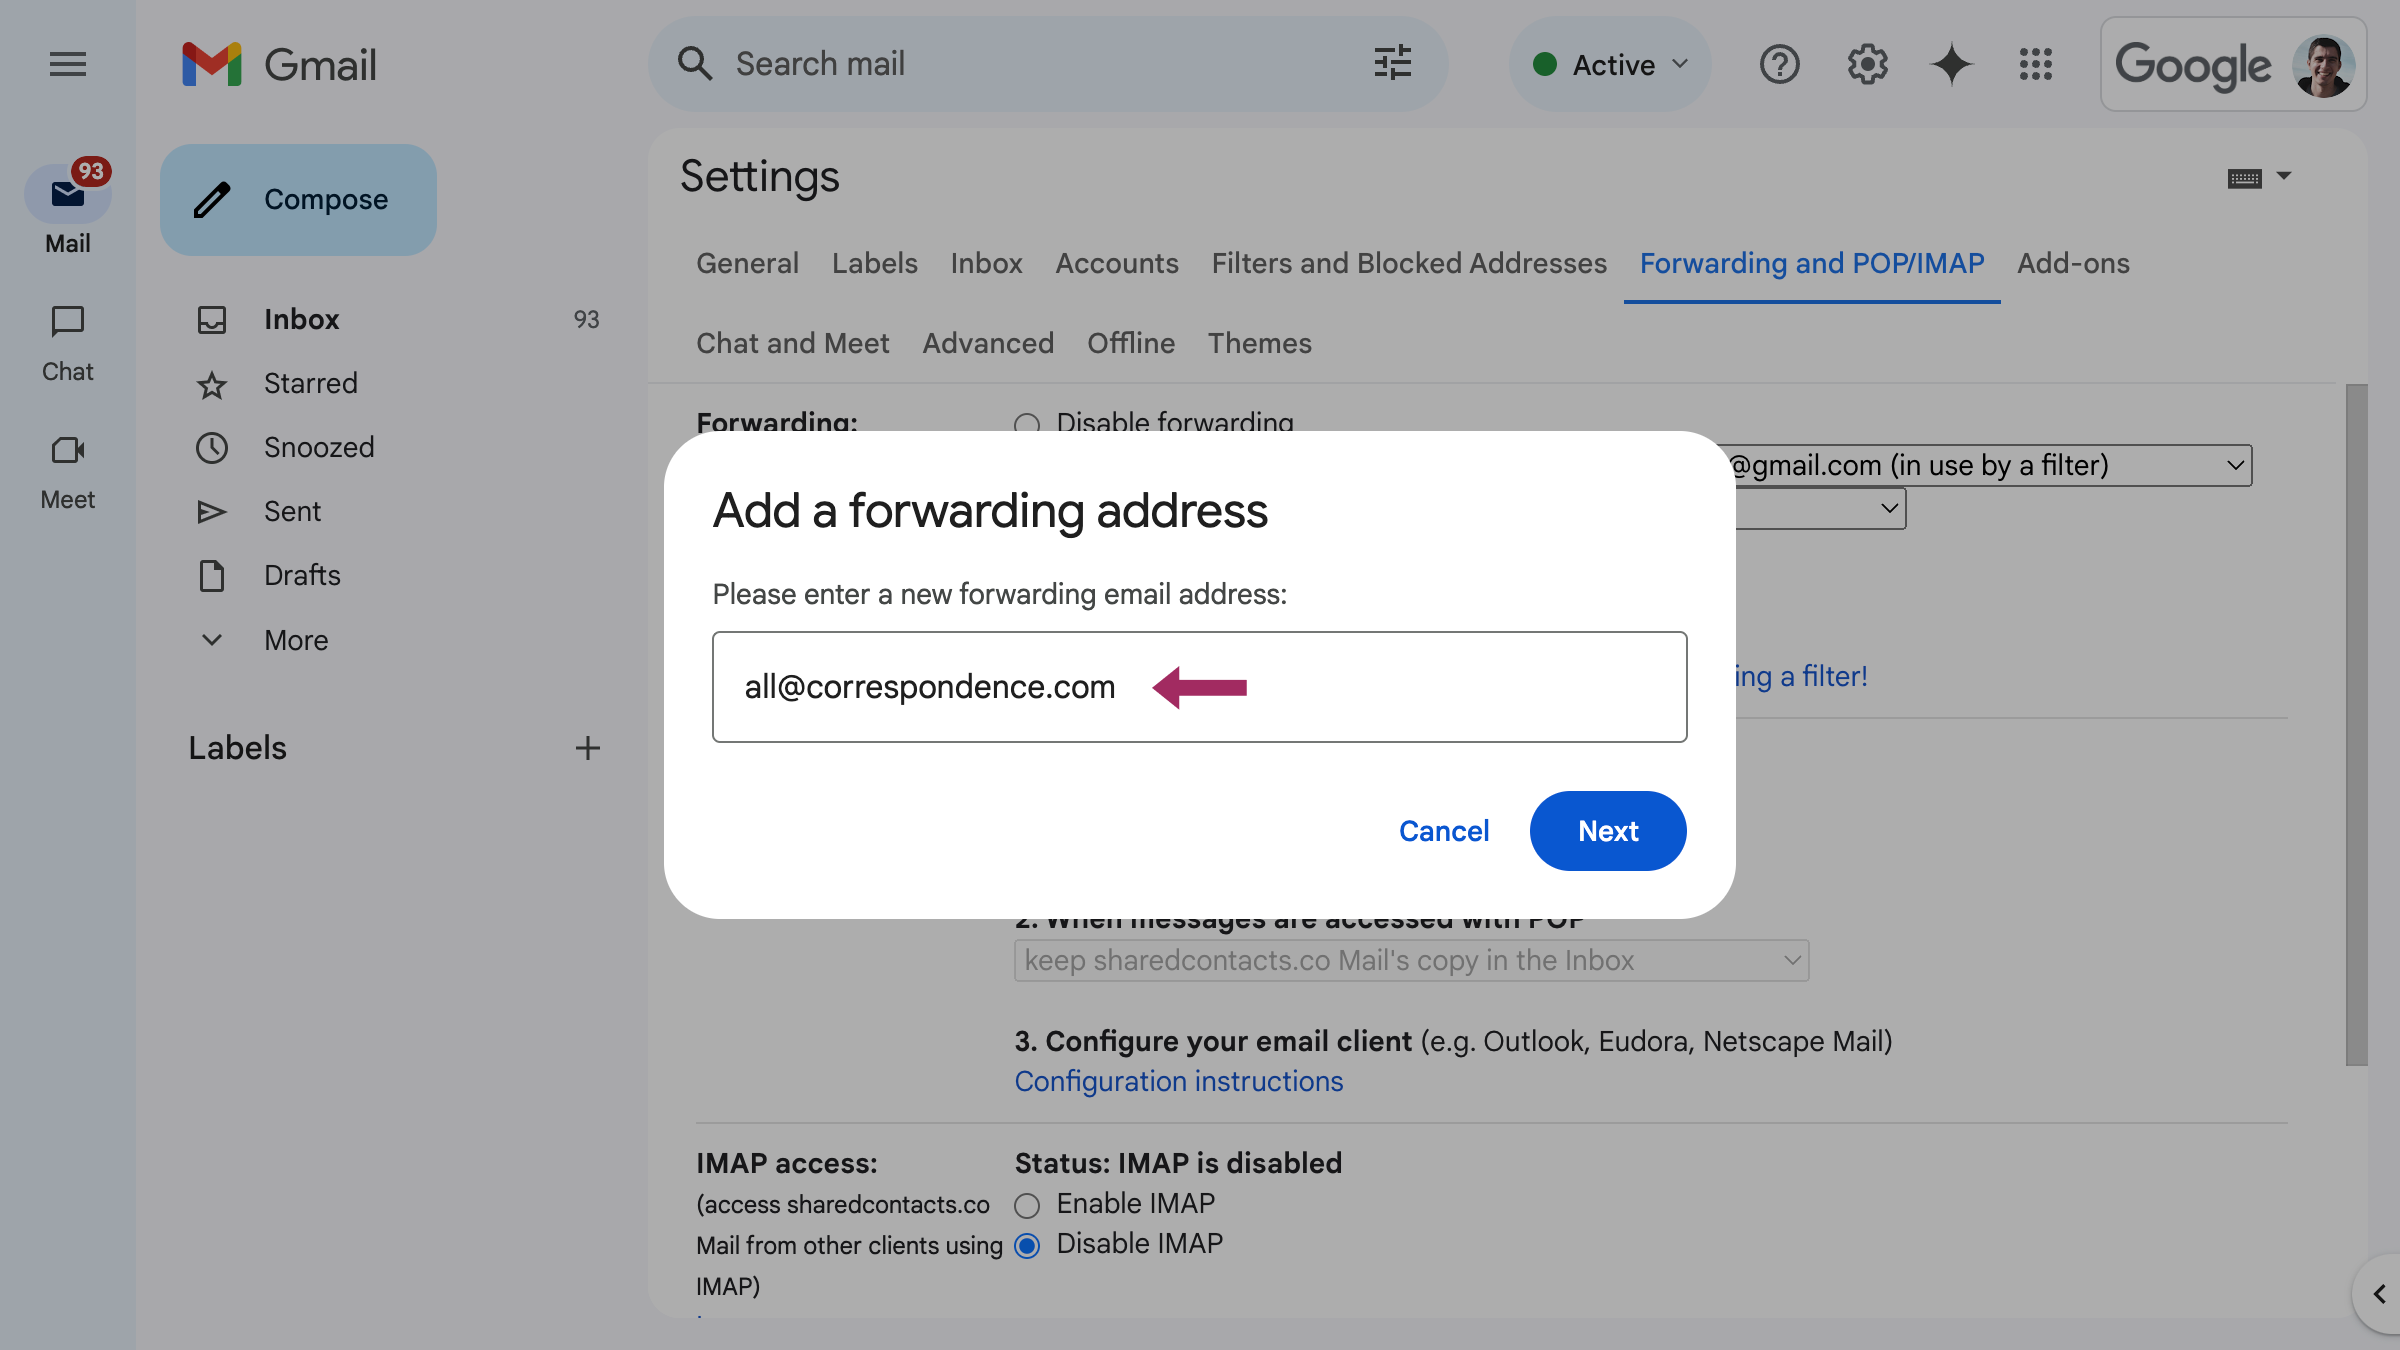
- Confirm the email address by clicking Next > Proceed > OK.
- The account that you are trying to forward messages to will receive a verification letter at this point. Click the link as prompted in the automatic email to confirm.
- Alternatively, request the owner of the email account that you intend to forward your emails to send a verification code from the email they receive. Then insert this code into the field that reads Verification Code and press Verify.
- Return to the Settings page for the Gmail account and refresh your browser.
- Click Forwarding and POP/IMAP tab again.
- At this point, decide if you want to keep a copy of the emails in the original inbox. You will have the option to keep mail copies in the inbox. So, you need to select Forward a copy of incoming mail to [email protected] and decide if you want to Keep Gmail’s copy in the Inbox.
- Click Save Changes at the bottom of the page.
Now that you have enabled “forward-to” address and functionality, let’s see how to forward Gmail to multiple addresses.
How to Create a Filter to Forward Emails to Multiple Recipients
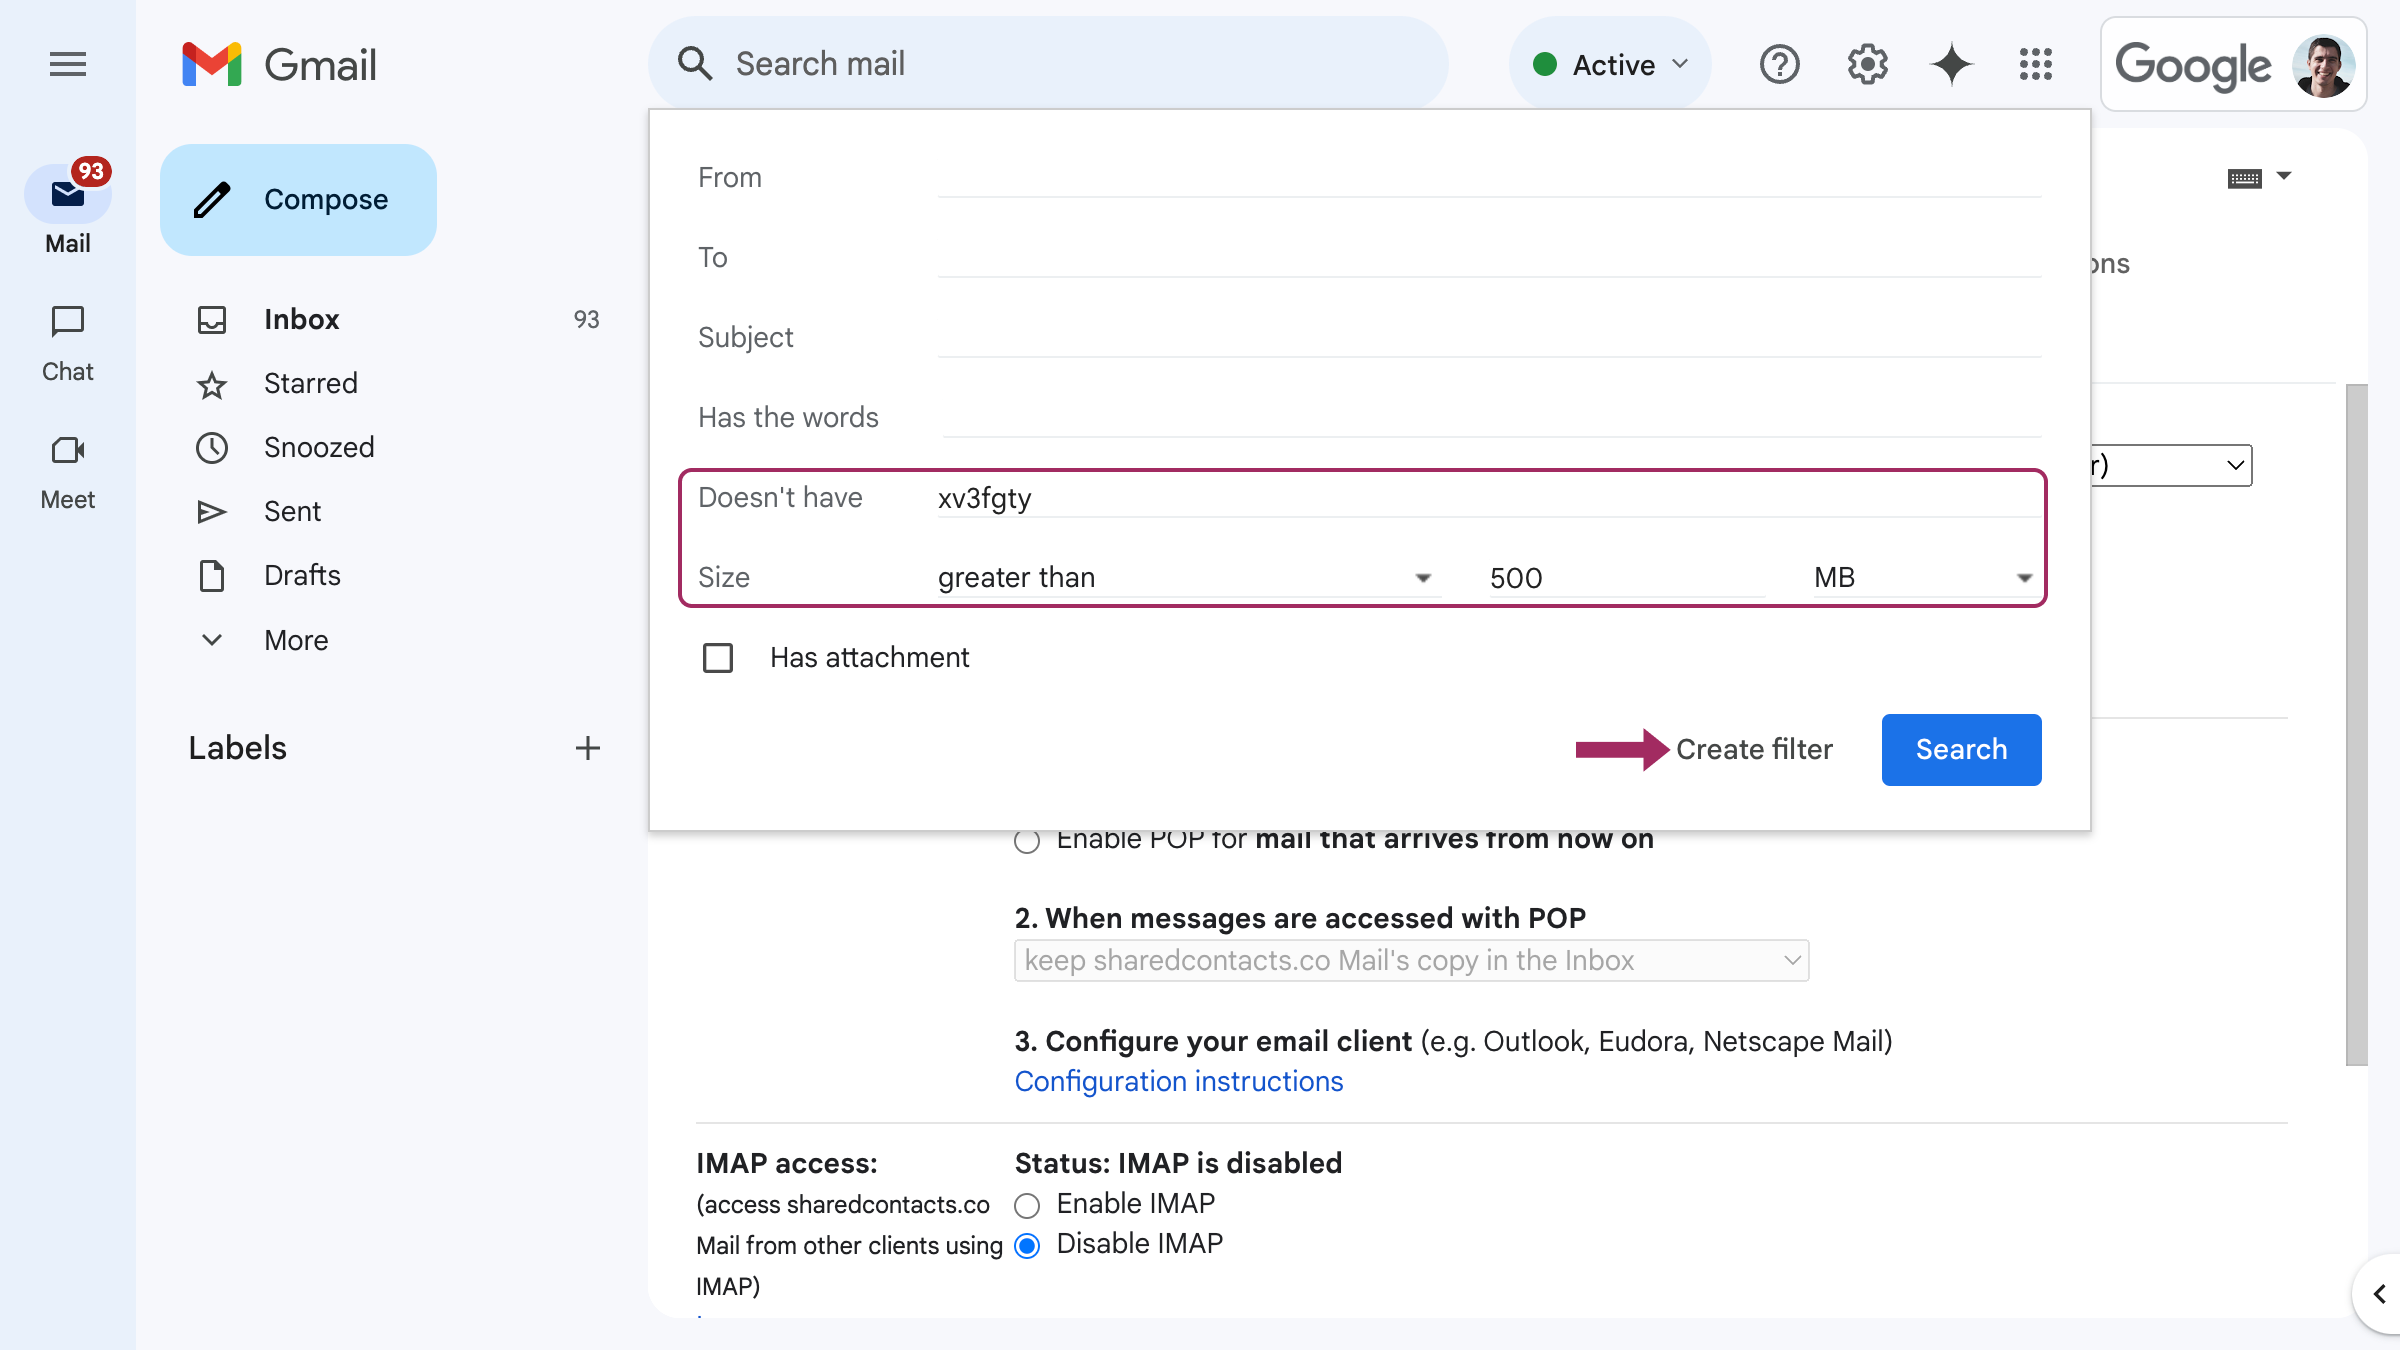
You can access the filter creation option from the same Gmail setting window:
Note: You can also access this by following the full path: Settings > Filters and Blocked Addresses > Create a new filter.
Once you’ve opened the filter creation window, follow these steps to set up your filter:
- Set a filter condition that applies to any email. For instance, you can specify that the subject line doesn’t include certain symbols or that the email size is less than 500 MB.
- Click Create filter.
The filter creation wizard will offer several options, including Forward it to. Here you have two options:
- Select from previously verified emails that can receive forwarded messages, OR
- Add forwarding address.
- Select one of the two options and click Create filter.
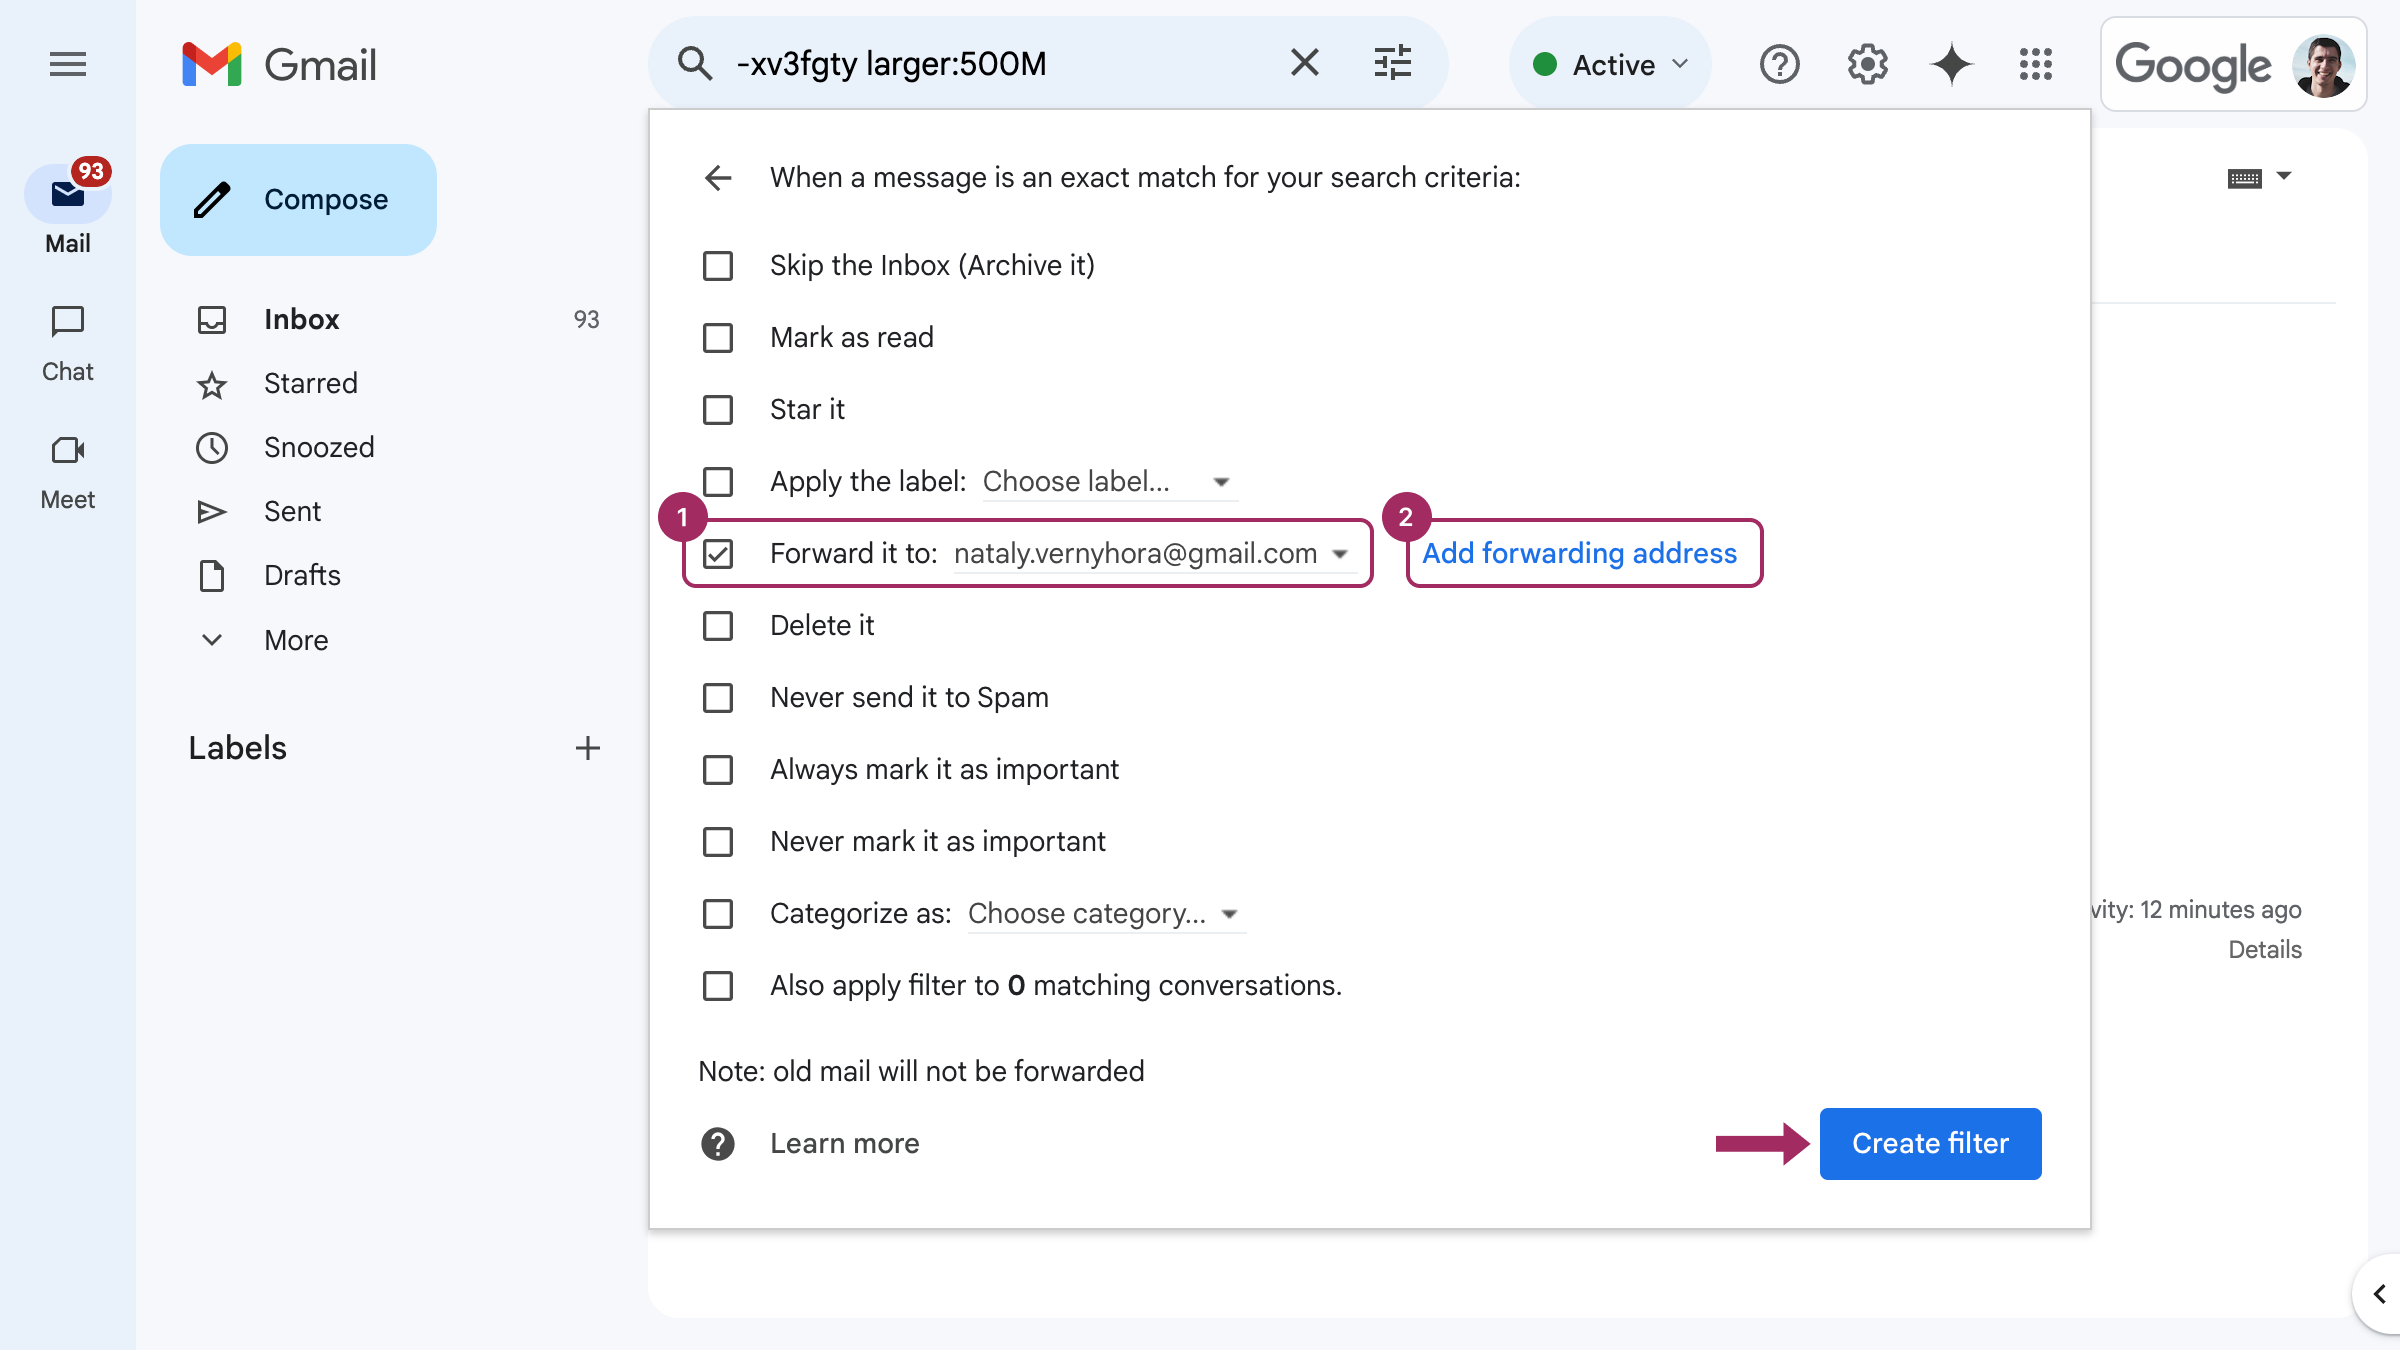
This option allows you to forward your emails to as many addresses as you’d like.
Tips for Forwarding Emails to Multiple Recipients
We recommend users add and verify all potential email accounts to their list of forwarding addresses ahead of time. This way, if you don’t always have direct access to an inbox, you won’t be delayed by the verification process. Keep in mind that you can add multiple forwarding addresses, but without the filtering option, you can only forward emails to one address at a time.
Another good practice is to ensure your IT department reviews your forwarding and filtering options in a corporate environment regularly or as part of the onboarding offboarding routine.
Even if you are a private Gmail user, check your forwarding settings sometimes. This will keep your correspondence optimized according to your current needs and priorities.
Beyond Email Forwarding: Share the Contacts Behind the Conversations
Automating email forwarding saves time, but true efficiency comes when your team also has instant access to the contacts behind those conversations. Forwarding client emails to a colleague? They’ll need the sender’s updated details – phone numbers, job titles, or alternate addresses – without digging through old threads or requesting CSV exports.
SharedContacts.com bridges this gap by letting you share contacts on Google. Instead of forwarding static contact cards, your team gets dynamic, permission-controlled access to entire contact groups. Edits sync instantly, so an updated client email in one inbox reflects everywhere. Pair this with your email forwarding rules, and you’ve got a smooth workflow: emails and their context stay in sync. Try it free and see how shared contacts amplify the power of automated forwarding.
FAQ
Can I add multiple forwarding addresses in Gmail?
Yes, you can add multiple forwarding addresses in Gmail and get them verified, but you can’t set forwards to these multiple addresses. You can only use one account in this functionality. Users may use the filtering option to enable automatic forwarding to multiple accounts.
Why forward emails to other accounts?
Corporate users often need to forward their correspondence to other users so as not to miss a sale or an urgent business even in the absence of one employee for rest or sickness. Other private usage examples include the convenience of checking one account as opposed to keeping an eye on many.
Related articles
What Is Google “Workspace Guests” Feature and How to Share Guest Account Contacts
How to Export WhatsApp Contacts
1 Comment
I actually ended up finding out about this functionality by falling into one of the internet’s rabbit holes – and voila! My vacations are much more enjoyable now – as my 2 people team takes care of all the routine stuff and messages me for anything urgent. It’s pretty convenient!